My club Bassetlaw has just launched a competition for members. The challenge is simple; build a diorama in no more than 300 square inches using RTR equipment. The entry would have no further constraints; any scale gauge shape and can be working or non working.
I’ve had some ideas of my own independently of the challenge. Firstly I’ve had a desire to get something small built and operational while progress on the Rede Valley is effectively stopped and I’ve been looking closely at the possibility of building a shunting puzzle layout. This could be self contained and interesting to operate while remaining small and highly portable.
Separately I’ve also got a desire to demonstrate to the club what is possible with DCC, especially if it is combined with some simple computer control. While I’ve briefly considered building something in ‘N’ my interest still lies in OO, so any such layout would be built to use existing stock and act as a test bed for some things to be used eventually on the bigger Rede Valley scheme.
So lets combine this all together.
The layout must have:
- A footprint of 300 square inches and use RTR
- Built in OO
- Include a shunting puzzle to make operating the layout interesting
- DCC controlled including any points and signals.
- Fine scale track work
- Scenically detailed with lots of human interest and atmosphere
- Realistically weathered stock, RTR doesnt mean shiny new condition.
- And it must be finished in time for B(NN)RS annual exhibition in November
It should have some other high priority key features, but these could be compromised if the design is proving too challenging
- The ability to have more than one train in operation at any time
- Control achieved entirely by iPhone or iPad talking to the layout over wifi.
- Hands free operation, so automatic coupling and uncoupling. This might be a challenge using DCC and RTR tension lock couplings.
- DCC controlled sound & lighting, and not just confined to the trains.
The layout could have some other features, but these are nice to have rather than essential, in this case these are about the way the layout works “under the bonnet” and wont change the way it appears to the viewer.
- DCC operation using a SPROG rather than a formal DCC system
- Automation
- Computer control via Raspberry Pi rather than PC
And finally it definately wont
- Be a static diorama, thats an easy cop out to make something pretty in such a small space.
- Have a traditional control panel with buttons or switches.
- Use code 100 track, this standard is entirely inappropriate for an exhibitable layout in the 21st century.

So, to the drawing board. The first constraint suddenly hit me with a vengeance. I began consulting Paul Lunn ‘s excellent book on designing Micro layouts. I took a look at the smallest schemes in the book. Nearly every one of Paul’s designs took up substantially more than 300 square inches. The smallest are based on boards around 2’4″ square, and the bigger micros (the majority of the designs) have their largest dimension at somewhere around 4’. I went back to primary school maths. 300 sounds like a big number. In reality it’s two quite small numbers multiplied together. (12″ x 24″ = 288″)
Sudden realisation: 300 inches is small, really small.
I’d separately been studying shunting puzzles, and was gravitating to an inglenook puzzle, normal accepted size 12″ x 48″ = 576″ – almost double the space! For those interested there is some excellent advice on inglenook trackplans on the shunting puzzles website.Gloom and despondency set in quickly. Working layout, interesting to operate, 300 inches, impossible?
However, no one said the layout footprint had to be rectangular. The inglenook needs a fan of 3 sidings and a head shunt. I realised that if I had a baseboard 4′ long then at one end it could be 4″ wide and at the other 12″. This could be achieved by a rectangle 4′ x 4″ and a right angled triangle with sides of 8″ and 2′. Total area 288″, leaving 12 inches to spare to add on somewhere. I experimented with some track and some wagons. The inglenook would fit, but there would be room for little else.
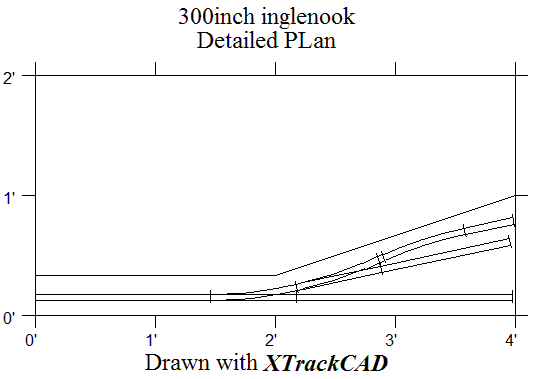
With some careful track alignment I realised that it might be possible to fit another track in parallel with the sidings and use that for a passenger service, this would enable my desire for a second train in motion and I could deploy some degree of automation to a shuttle service. The passenger service sharing part of one of the goods roads would also add some additional complexity to the shunting puzzle as it would introduce the need to clear that road every time a passenger service was due.
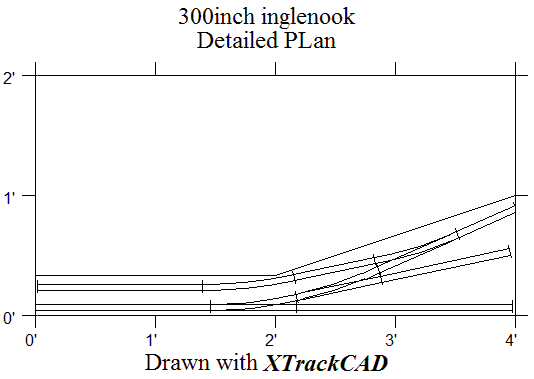
There are two disadvantages to this design, firstly the additional track leaves very little space for scenic development, and secondly the only way a shuttle could disappear off scene would be onto a storage cassette that would be additional to the baseboard footprint, through a shunting road designed to take 3 wagons. A shunting puzzle designed to marshal a 5 wagon train with an exit road from the yard restricting exit to only 3 wagons just doesn’t look plausible. Design rejected!
I then had an interesting thought, what about a roundey roundey continuous run, is it possible in 300 inches? If I used 15 inch radius curves, common in many of Cyril Freezer’s plan a circle of track would be 95 inches in circumference. A doughnut baseboard 3 inches wide would be less than 300 inches, However, the operating hole in the middle of such a small circle would be too small to be usable. and the overall footprint of the layout including the hole in the middle is a lot bigger than 300 inches, so its probably cheating! Essentially I’d create a scenic toy train set and this definately fails the interesting to operate criteria.
At this point I picked up the current (March 2013) edition of Railway Modeller and began reading an article on micro layouts I’d previously skimmed past. The article featured Chapel Street by Julian Andrews , a project built in two box files that incorporated an inglenook shunting puzzle and a high level passenger service. The compromise to fit in the tiny space is achieved by turning the inglenook puzzle into a 3/2/2 rather than a 5/3/3 and allowing a shortening of the sidings and head shunt so that 12 inches is eliminated from the length of the inglenook. Some further research on Carl Arendt’s micro layout website demonstrated that a 3/2/2 was indeed a feasible puzzle, so a plan based closely on Chapel Street was clearly going to fit the vast majority of my criteria for the new scheme.
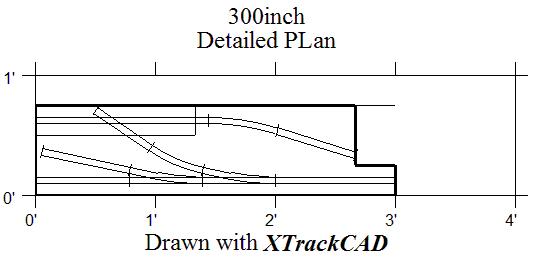
There are some fundamental differences to Chapel Street
- My plan is a mirror image of chapel street, to deliberately look different. The baseboard based on a 36″x9″ rectangle with a small cut out to lose 24″ and get back to 300″ exactly, and not based on the dimensions of two box files with bits added on to allow trains to move around.
- Location moves from ex GWR in 1960s West Country to 1940s wartime LNER in the North East, and the scenic treatment of the layout therefore needs to be quite different. Bleak, gritty and industrial along with a good portion of austerity will be the key to the right atmosphere.
- Passenger line modified to take a locomotive hauled train. Using an LNER sentinel railcar would be very pretty, but once again would break the RTR rule.
- Use of Peco code 75 track work instead of Set track. Settrack points are INSULFROG, and my experience is that using these with short wheelbase locomotives running at very slow speed doesn’t give reliable running, add to this DCC and electro frog becomes a must. Course scale code 100 also just doesn’t look right in my opinion and while I’d like to play with other track options all but code 75 would break the RTR rule.


Not sure how big Melbridge Parva is in inches but it can’t be far off. Not sure if there are some ideas in here for you:
http://philsworkbench.blogspot.co.uk/search/label/Layout%20in%20a%20box
Phil
Very interesting. Melbridge Parva goes back to a period before I was a regular reader of your blog. It’s very impressive, and certainly provides a few more ideas.
Size wise it does fit well inside 300 inches, 73cm x 20cm comes in at about 235 square inches by my maths.
Kevin
Best of all, it fits inside a readily available plastic box for transit. Hornby Yearbook Number 3 (probably available cheap) has the full article but much of it is on the blog.
Don’t forget the Melbridge Box Company too: http://www.pagenumberone.co.uk/layouts/Boxfile/index.htm Another little layout.
Love it, what a super little layout!